28/02/2020
Recupar a chave de Upload do cartão Eye-fi
As the Eye-fi software no longer runs with these Eye-Fi SD cards, this video will show you how to make the card useable again. You can
1) retrieve your upload key and wifi password
2) run an Android app called MoPhotos
3) Tether wirelessly with your DSLR camera and transfer your photos
**** UPDATE Dec 21, 2017 ****
You can now also run the recent Eye-fi utility and be able to transfer the pictures from your DSLR camera right to your PC - no need for MoPhotos -Steps below Here's the link :
http://1wayofdoingit.blogspot.com/2017/12/how-to-get-your-eyefi-upload-key-and.html
https://github.com/hansendc/eyefi-config
http://wifibooth.com/help/articles/eyefiuploadkey-x2pro/#sectionC
Follow these steps.
A. First you must configure the Eye-Fi card settings
- Insert the Eye-Fi card into your computer (using the provided card-reader, or however you normally do it)
- Start the Eye-Fi app. At the time of writing, this is called Eye-Fi Center.
-
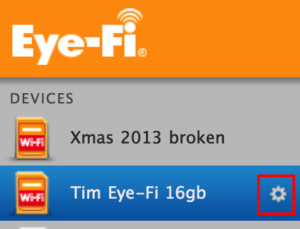
Locate the Eye-Fi card in the left-hand column, and click the little cog icon:
- On the first tab (“Networks”) verify that all the wireless networks you wish to connect with are listed as Private Networks. Important: turn OFF direct mode, if you plan to use the recommended setup of connecting to an existing wifi hotspot.
- On the second tab (“Photos”), configure photos to be sent to this computer (the one you’re on now; the options below like sub-folder etc do not matter), and disable the Online (Eye-Fi cloud) feature
- On the third tab (“Raw”), disable RAW file transfers (the app does not support RAW files)
- On the fourth tab (“Video”), disable Video transfers (the app does not support Video files)
- On the fifth tab (“Eye-Fi View”), disable Eye-Fi view (you don’t want the card chewing up bandwidth, and using this service at the same time as the app has not been tested)
- On the seventh tab (“Geotagging”), disable Geotagging
- On the eighth tab (“Transfer Mode”), first sub-tab (“Selective Transfer”), set this to Automatic
- On the eighth tab (“Transfer Mode”), second sub-tab (“Relayed Transfer”), disable Relayed Transfer (not supported by the app and appears to influence how upload keys are made)
- Save all the settings and make sure your changes were saved successfully.
B. Next, you need to transfer at least one photo to the computer, to ensure the Upload Key and Transfer Mode are saved to your Settings.xml file

- Eject the Eye-Fi card safely from your computer, and leave all of the Eye-Fi software running. Insert the Eye-Fi card into your camera.
-
Take some pictures on your camera, until at least one or two have copied from the Eye-Fi card onto the computer. You should see this happen via a popup window, or in the Eye-Fi center directly. You might need to take 5+ photos until anything happens.
- If you can’t get it to work, check that your computer is connected to the same wifi network that you specified in step A-4 above (the wifi network the Eye-Fi card will connect to)
-
Once the test photos have finished transferring, quit out of all Eye-Fi software (Eye-Fi Helper and Eye-Fi Center). Make sure that you don’t minimize — you must quit instead.
- On a Mac, select Eye-Fi center and hit CMD-Q. Then select Eye-Fi helper on the top-bar; the helper icon looks like this: . Select Quit from the menu.
C. Finally, you need to retrieve your Upload Key from your Settings.xml file
On Mac, open Finder, hold down ALT, and click the Go menu -> Library. Keep holding ALT until you clicked on Library. Inside the Library folder, find the Eye-Fi folder -> the Settings.xml file is in here.
On Windows Vista, 7, and 8, the location is C:\Users\[user]\AppData\Roaming\Eye-Fi\Settings.xml – where [user] – is your current login name.
On Windows XP, the location is C:\Documents and Settings\[user]\Application Data\Eye-Fi\Settings.xml
Once you have found your Settings.xml, follow these steps:
- Open Settings.xml in your favorite text editor (ie. Notepad on Windows or TextEdit on Mac)
- Check and make sure that TransferMode is set to 2, as in the example below. If not, close Settings.xml and go back to repeat step A-5 by unchecking “Upload photos to this computer”, saving, re-checking it, and saving again.
- Check and make sure that your Card only has ONE UploadKey. If it is has more than one, do the following: delete ALL upload keys in the .xml file, save it, close it, and repeat all steps from the very beginning again
- OK phew, done! Your upload key is sandwiched between <UploadKey> and </UploadKey>. In the example below, my UploadKey is f2f5a1fff422b2b8e3d62d6462c078be — that’s what I need to put into the WiFi Booth app. Note that it’s safest to copy/paste the key into an email, email it to yourself, open the email on the iPad, copy it there, and paste it directly into WiFi Booth.
<?xml version="1.0" encoding="UTF-8" standalone="yes" ?>
   <Config version="2.0">
    <ShowThumbnailPreview>true</ShowThumbnailPreview>
     <MIB>
       <ReceivedCounter>17</ReceivedCounter>
     </MIB>
     <Cards>
       <Card MacAddress="00-18-56-62-4d-f7">
        <UploadKey>f2f5a1fff422b2b8e3d62d6462c078be</UploadKey>
        <DownsyncKey>6ca3311d93e46a9f3404c5b2676ab605</DownsyncKey>
        <TransferMode>2</TransferMode>
        <TransferModeTimestamp>1417466370</TransferModeTimestamp>
...
Notícias
| Data | Título |
|---|---|
| 27/04/2024 | Programação da Festa de Sant’Ana 2024 |
| 26/04/2024 | Fortal irá ocorrer em uma nova Cidade Fortal |
| 21/04/2024 | Pecuária de Goiânia 2024 |
| 14/04/2024 | Forró du Vale abre os festejos juninos do interior da Bahia |
| 07/04/2024 | Festival Gastronômico de Lagoa Nova/RN 2024 |
| 24/03/2024 | São João 2024 de Campina Grande |
| 23/03/2024 | São João 2024 de Cruz das Almas |
| 19/03/2024 | São João de Assú/RN 2024 |
| 14/03/2024 | Festival Forrozar |
| 13/03/2024 | Samba da Raffe realiza edição especial St. Patrick’s |
| 11/03/2024 | Altofolia 2024 |
| 07/03/2024 | Mossoró Cidade Junina 2024 |